Storm Damage? Here's Your 5-Step Emergency Guide from Salisbury Roofing Experts
- sean fahey
- Dec 15, 2025
- 6 min read

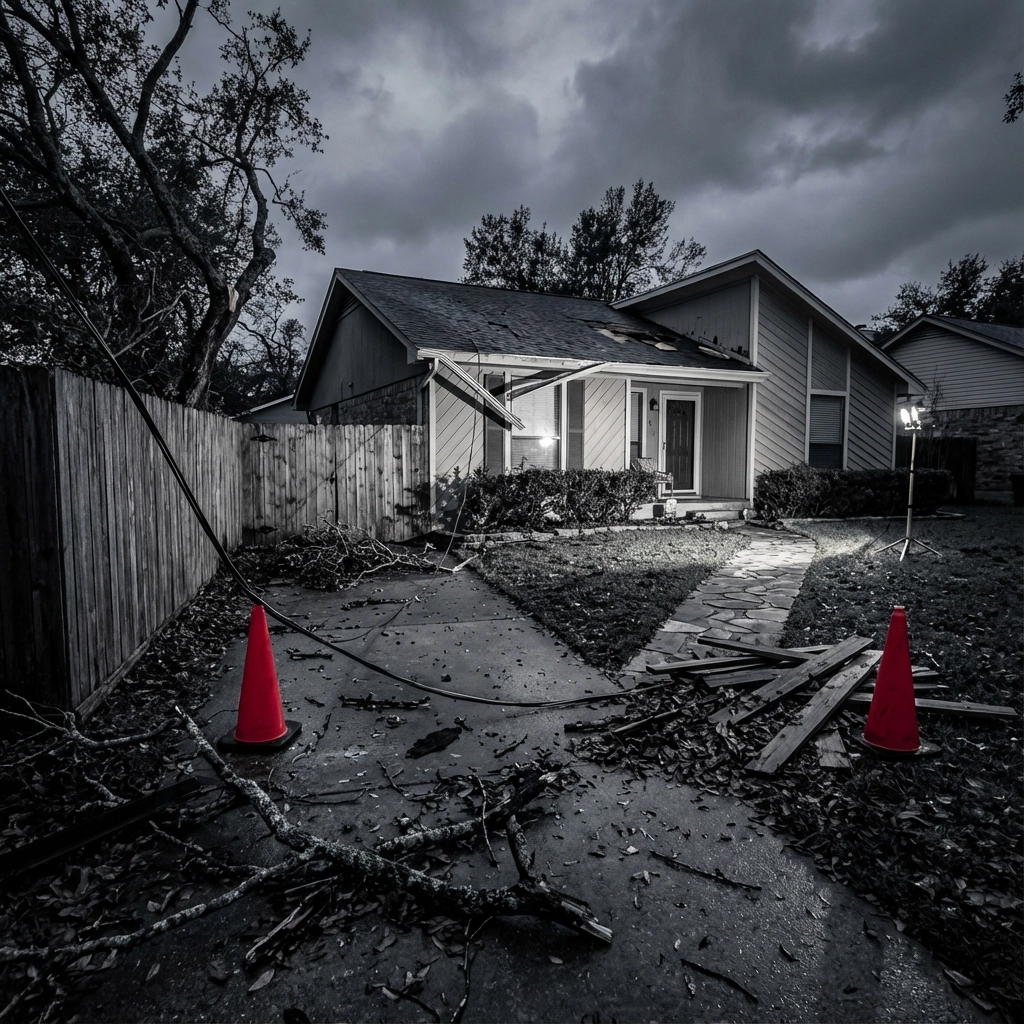
When Mother Nature unleashes her fury on the Delmarva Peninsula, your roof often bears the brunt of the damage. Whether it's a sudden hailstorm, damaging winds, or heavy rainfall, storm damage to your roof can quickly escalate from a minor inconvenience to a major disaster if not handled properly.
As roofing professionals who've been serving the Salisbury area and surrounding communities since 1947, we've seen it all: from minor shingle damage to complete roof failures. The good news? Taking the right steps immediately after storm damage can save you thousands of dollars and prevent further damage to your home.
Here's your complete 5-step emergency guide that every homeowner should know.
Step 1: Safety First – Don't Be a Hero
The absolute first rule after any storm damage is never compromise on safety. We can't stress this enough: your life is worth more than any roof repair bill.
Stay off the roof entirely, especially if it appears unstable, is still wet from rain, or if severe weather conditions persist. Even experienced roofers wait for safe conditions before climbing up to assess damage. A damaged roof may have compromised structural integrity that isn't immediately visible from the ground.
Before doing anything else, conduct a quick safety sweep of your property:
Check for downed power lines around your home
Look for fallen trees or large branches that could shift unexpectedly
Identify any gas leaks (you'll smell them)
If water is dripping near electrical outlets or light fixtures, shut off power to that area immediately
Inside your home, keep everyone away from areas where you notice leaking or water damage. Wet electrical systems pose serious electrocution risks, and water-damaged ceilings can suddenly give way.
If you smell gas or see sparking electrical equipment, evacuate immediately and call emergency services before worrying about roof damage.
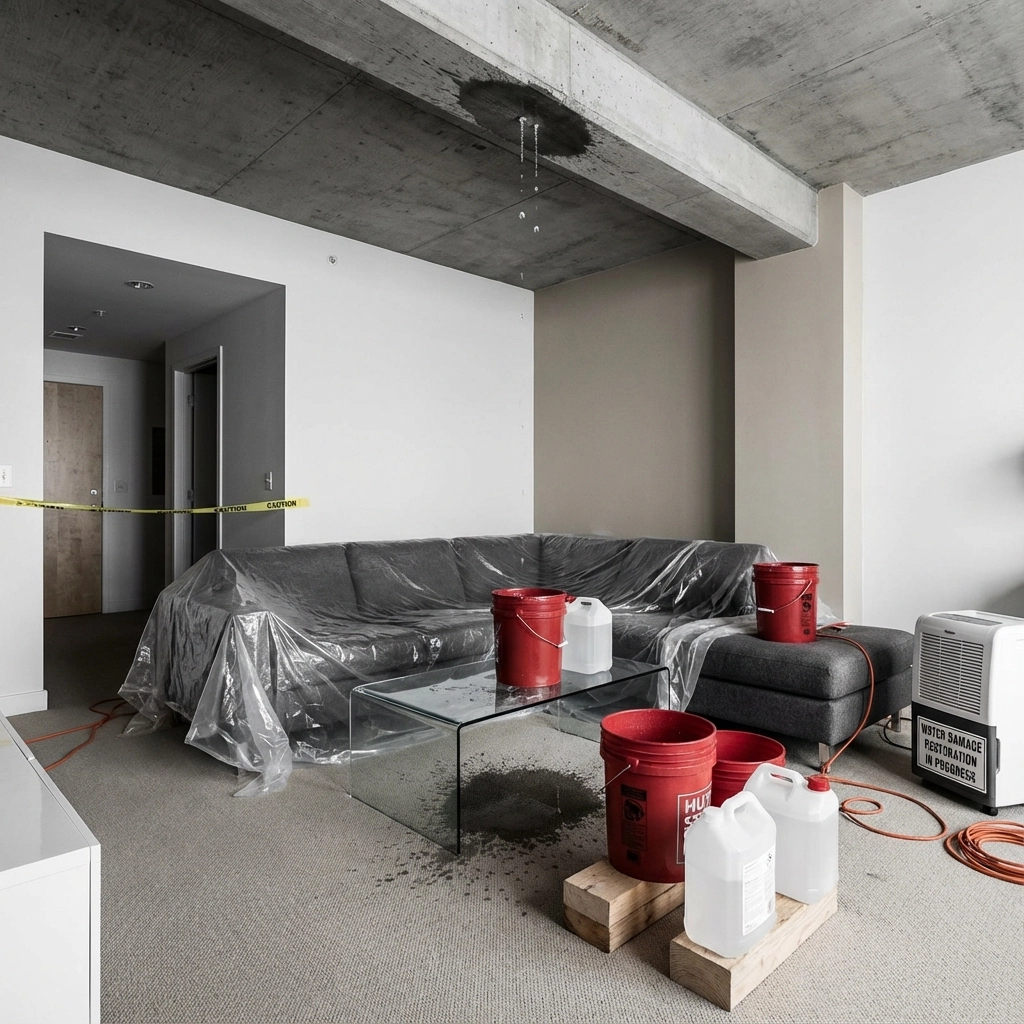
Step 2: Contain and Minimize Interior Damage
Once you've confirmed everyone is safe, your next priority is preventing water damage from spreading throughout your home. Water intrusion can quickly damage flooring, furniture, electronics, and even your home's structural elements.
Quick containment actions:
Place buckets, pots, or any waterproof containers under active leaks
Lay down plastic sheets, tarps, or even garbage bags to protect furniture and carpeting
Move electronics, important documents, and valuables away from affected areas
Use towels or rags to soak up standing water on floors
If water is pouring through your ceiling, don't just put a bucket underneath: the pooling water in your ceiling cavity could cause a larger section to collapse. Instead, carefully poke a small hole in the ceiling with a screwdriver or knife at the lowest point of the bulging area to create a controlled drainage point.
This containment step buys you valuable time before professional repairs can begin. Remember, most homeowner's insurance policies require you to take reasonable steps to prevent further damage, so these mitigation efforts can actually help with your claim.
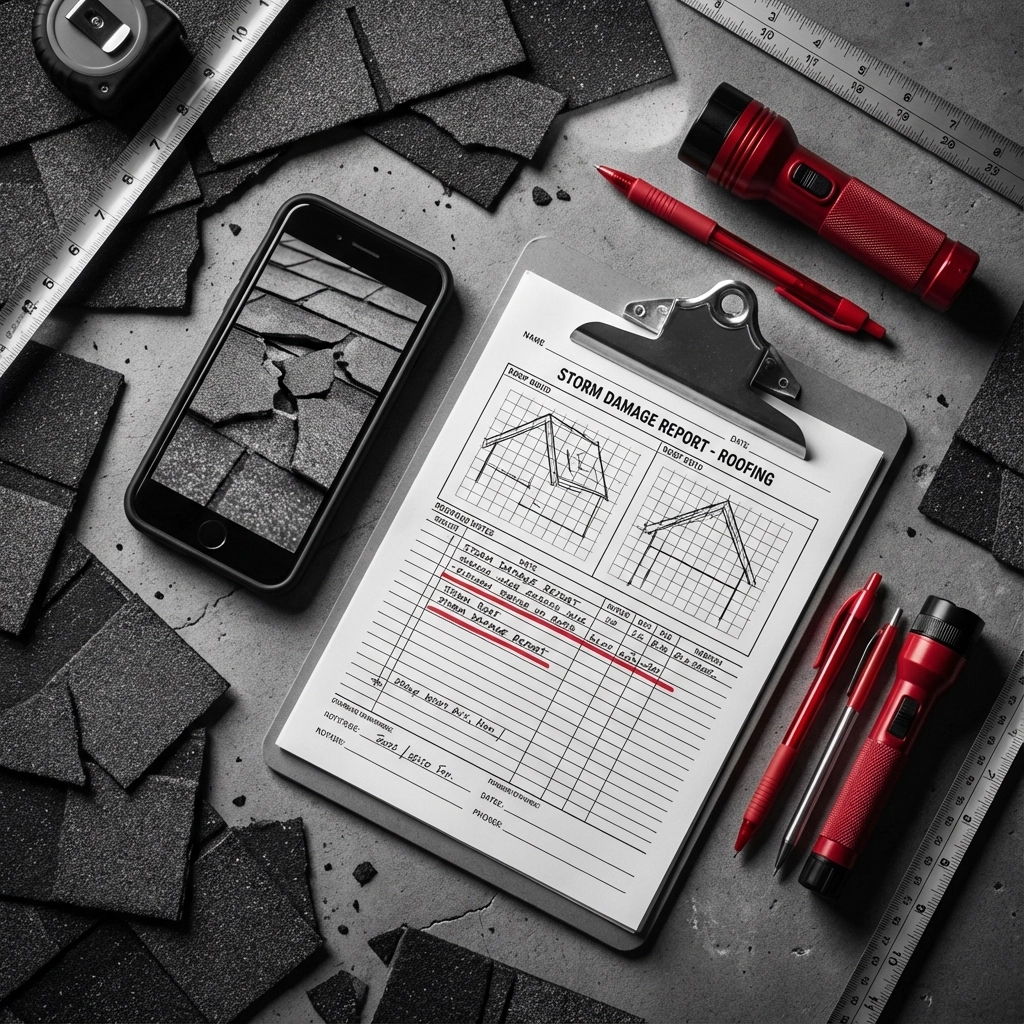
Step 3: Document Everything Like a Detective
Your insurance claim's success often depends on thorough documentation, so channel your inner detective and document everything you can safely observe.
Photo documentation checklist:
Take wide shots showing the overall damage area
Capture close-up photos of specific damage (missing shingles, holes, cracked flashing)
Document interior damage including water stains, damaged belongings, and standing water
Photograph the storm conditions if safe to do so (hail on the ground, fallen branches, etc.)
Take "before" photos from different angles if you have them on your phone
Written documentation:
Note the date and time when damage occurred
Describe weather conditions (wind speed if known, hail size, rainfall duration)
List damaged items inside your home
Keep receipts for any emergency supplies you purchase (tarps, buckets, etc.)
Don't wait to document: water stains can fade, debris gets cleaned up, and memories of specific details become fuzzy over time. The more comprehensive your documentation, the smoother your insurance claim process will be.
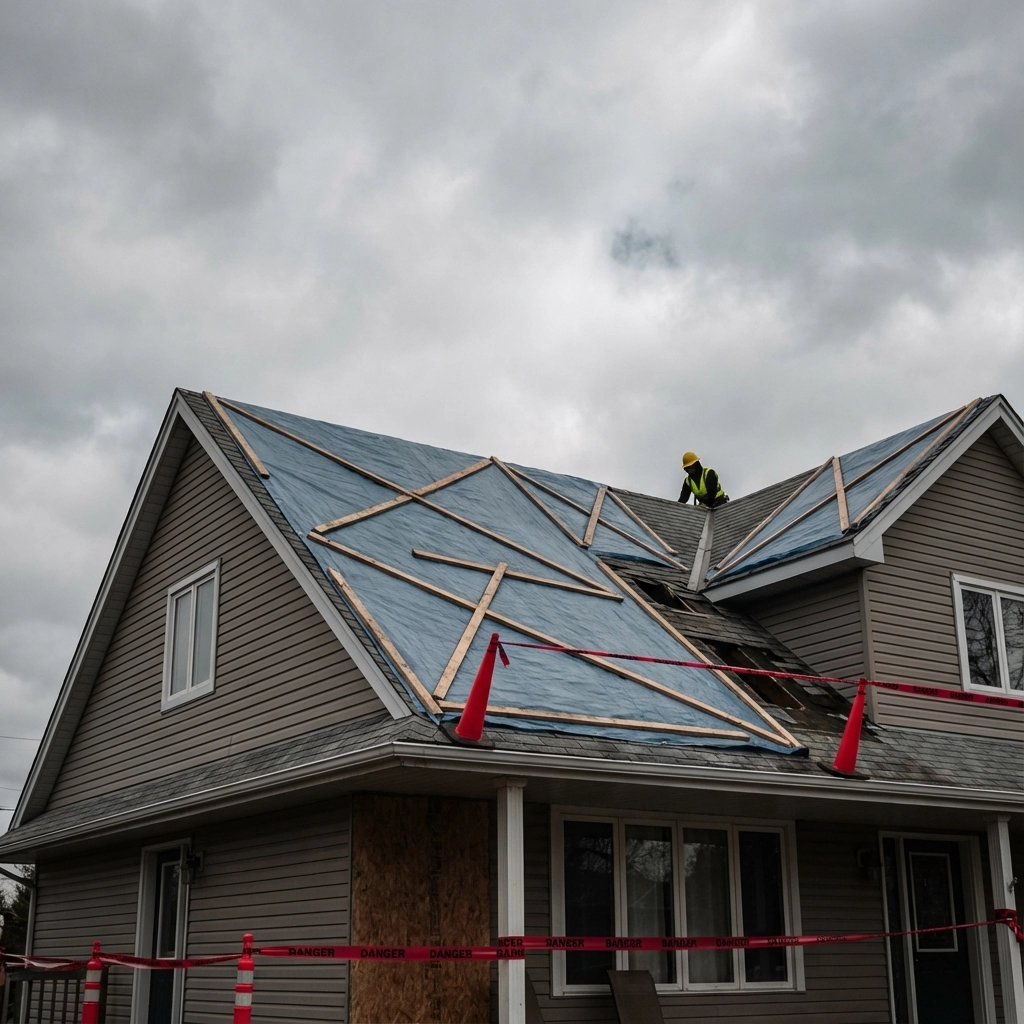
Step 4: Implement Temporary Protection Measures
While you're waiting for professional repairs, temporary measures can prevent thousands of dollars in additional damage. However, only attempt these if you can do so safely from the ground or through accessible windows.
Safe temporary fixes:
For small holes or punctures: Apply roofing cement or waterproof sealant from inside your attic if accessible. This is only suitable for holes smaller than a quarter.
For larger damaged areas: Heavy-duty plastic sheeting or tarps can provide temporary weather protection. If you can safely access part of the roof (like a single-story section), secure the tarp so it extends well beyond the damaged area and over the roof ridge if possible.
Securing tarps properly:
Use 2x4 lumber to weigh down edges rather than nailing through good roofing material
Ensure the tarp extends at least 4 feet beyond the damaged area in all directions
Avoid creating areas where water can pool on the tarp
Important: These are emergency stopgap measures only: not permanent solutions. Improper temporary repairs can sometimes cause more damage than leaving the area exposed, so when in doubt, wait for professional help.
At Peninsula Roofing, we offer 24/7 emergency response services precisely because we understand that storm damage can't wait for regular business hours.
Step 5: Contact Insurance and Call the Professionals
Now it's time to set the wheels in motion for permanent repairs. You'll want to handle insurance and contractor calls strategically.
Insurance contact timeline:
Contact your insurance company within 24-48 hours of the damage. Many policies have specific reporting requirements, and delays can complicate your claim. When you call:
Have your policy number ready
Provide them with your photo documentation
Ask about preferred contractors or specific procedures they require
Get a claim number and the contact information for your assigned adjuster
Ask about temporary living arrangements if your home is uninhabitable
Choosing a roofing contractor:
Not all roofing contractors are created equal, especially when it comes to storm damage repair. Here's what to look for:
Local companies with established reputations (avoid door-to-door storm chasers)
Proper licensing and insurance
Experience specifically with insurance claims
Written estimates that detail materials and labor
References from recent local projects
Red flags to avoid:
Contractors who show up unsolicited after storms
Anyone asking for full payment upfront
Companies without local addresses or proper licensing
Estimates significantly higher or lower than others
Pressure to sign immediately
As a company that's been serving the Delmarva Peninsula since 1947, we've built our reputation on quality work and honest dealings with both homeowners and insurance companies. We understand the local building codes, weather patterns, and insurance requirements that affect roofing projects in our area.
What to Expect from Professional Assessment
When a qualified roofing contractor arrives for assessment, they'll conduct a thorough inspection that goes far beyond what you can see from the ground. Professional assessment includes:
Structural integrity evaluation of roof decking and supports
Flashing inspection around chimneys, vents, and roof transitions
Gutter and downspout damage assessment
Interior inspection for hidden water damage
Detailed written report with photos for insurance purposes
Hidden damage is often more extensive than initial appearances suggest. What looks like a few missing shingles from the ground might reveal compromised underlayment, damaged decking, or compromised insulation once professionals get up there.
Working with Insurance Adjusters
Your insurance adjuster will typically want to inspect the damage personally before approving repairs. Having a professional roofing contractor present during this inspection can be invaluable: they speak the same technical language and can point out damage that might be missed otherwise.
Remember that insurance adjusters work for the insurance company, not for you. While most are fair and professional, having your own expert advocate ensures nothing gets overlooked in the assessment process.
Prevention for Future Storms
Once repairs are complete, consider upgrades that can minimize future storm damage:
Impact-resistant shingles in hail-prone areas
Improved attic ventilation to reduce wind uplift
Regular maintenance to keep gutters clear and flashing sealed
Tree trimming to remove branches that could fall on your roof
When to Call Peninsula Roofing's Emergency Line
Don't hesitate to call our emergency line if you're dealing with:
Active leaking that threatens your home's interior
Large sections of missing roofing material
Visible structural damage to roof decking or supports
Damage that compromises your home's weather protection
Our experienced team can provide immediate temporary protection while working with your insurance company to plan permanent repairs. We're available 24/7 because we know storm damage doesn't happen on a convenient schedule.
Storm damage to your roof is stressful, but following these five steps can minimize the damage to both your home and your wallet. Stay safe, document thoroughly, protect what you can, and get professional help quickly. With the right approach, your roof: and your peace of mind: can be restored.
For emergency roofing services in Salisbury, Ocean City, Cambridge, and throughout the Delmarva Peninsula, contact Peninsula Roofing at (410) 742-6163. We're here when you need us most.
Comments