Chimney Flashing 101: The Silent Leak Source on Salisbury Roofs

A water stain near your chimney does not automatically mean your entire roof is failing. In many Salisbury, MD homes, the actual problem is much smaller: and much more localized: damaged or improperly installed chimney flashing.
Flashing is the weatherproof barrier where the chimney meets the roof. Because chimneys interrupt the natural flow of rainwater, this area receives concentrated runoff and requires careful installation. In fact, chimney flashing is one of the most common: and often the number-one: leak entry points on a residential roof.
The good news is that most chimney flashing leaks can be repaired without replacing the entire roof. The key is identifying the actual failure and correcting it at the source.
What Is Chimney Flashing?
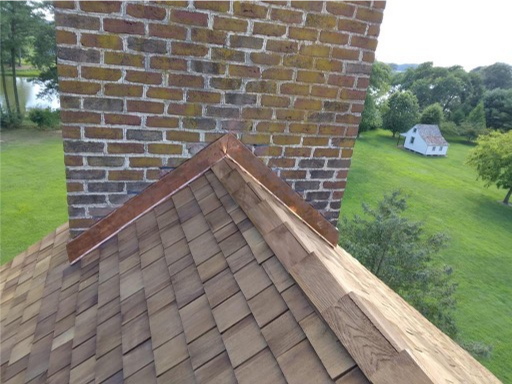
Chimney flashing is not one single piece of metal. It is a system of overlapping components designed to direct water away from the chimney and into the roof drainage path.
A properly installed chimney typically includes:
Step flashing: Individual L-shaped metal pieces woven between the shingle courses along the sides of the chimney.
Counter flashing: Metal installed into the chimney masonry that overlaps the step flashing and helps prevent water from getting behind it.
Base or apron flashing: Flashing installed along the lower, downhill side of the chimney to direct water over the shingles.
Cricket or saddle: A raised structure on the uphill side of a wide chimney that divides and redirects water around the chimney.
Step flashing works with the shingles in a repeating pattern: shingle, flashing, shingle, flashing. Each piece overlaps the one below it so water continues moving downhill instead of finding a path beneath the roof covering.
Counter flashing is equally important. It should be embedded into a shallow cut, known as a reglet, in the mortar joint of the chimney. The counter flashing then overlaps the vertical portion of the step or base flashing. This two-part design allows the roof and masonry to move independently while maintaining a water-shedding barrier.
Why Does a Chimney Need a Cricket?
A chimney that is wider than approximately 30 inches should generally have a cricket or saddle installed on its uphill side. This small, peaked structure splits the flow of water and directs it around both sides of the chimney.
Without a cricket, water can collect behind a wide chimney. Debris may accumulate there, and repeated wetting can accelerate deterioration of the flashing, underlayment, decking, and masonry.
A missing or poorly built cricket is a common reason that a chimney leak returns after a superficial repair.
Signs Your Chimney Flashing May Be Failing
Chimney flashing problems are not always visible from the ground. Water can travel along roof decking, rafters, insulation, or drywall before it appears inside the home. Look for these warning signs:
1. Water Stains Near the Chimney
Brown or discolored stains on a ceiling or wall near the chimney often indicate water intrusion. The stain may appear after heavy rain, wind-driven rain, or during Delmarva’s fall and winter freeze-thaw cycles.
The location of the stain does not always match the exact location of the leak. A professional inspection should trace the water path from the interior back to its highest point in the attic and roof system.
2. Rust or Corrosion on the Flashing
Surface discoloration is not always an emergency, but rusted-through metal, deep pitting, or missing sections means the flashing may no longer be able to shed water. Coastal salt air can accelerate corrosion, especially on homes closer to the Chesapeake Bay or Atlantic coast.
3. Cracked or Missing Sealant
Sealant is a secondary line of defense: not the primary flashing system. Over time, ultraviolet exposure dries out caulk and roofing cement. Cracks, gaps, or missing sealant along the top of the counter flashing can allow water behind the metal.
4. Loose or Lifted Flashing
Flashing can pull away from masonry as the chimney and roof expand and contract at different rates. Wind, ice, and freeze-thaw movement can also lift or bend individual pieces.
5. Buckled Shingles Around the Chimney
Buckled or raised shingles may indicate damaged step flashing, trapped moisture, or deterioration of the roof decking beneath the chimney. They may also signal that the flashing was installed incorrectly during a previous roof repair or replacement.

Why Chimney Flashing Fails on Delmarva
Homes throughout Salisbury and the Delmarva Peninsula experience several conditions that are hard on chimney flashing.
Coastal salt air accelerates corrosion. Salt carried through the air can contribute to deterioration of exposed metal, particularly when flashing is already scratched, poorly coated, or made from an incompatible material.
Freeze-thaw cycles widen small gaps. Water enters a small crack or joint, freezes, expands, and places pressure on the surrounding material. Repeated cycles can loosen mortar, separate counter flashing, and enlarge openings.
Ultraviolet exposure degrades sealants. Caulk may look intact from the ground but become brittle after years of direct sunlight. Once it loses flexibility, it can no longer accommodate movement between the chimney and roof.
Improper repairs can hide the real problem. Smearing roofing tar over a joint may stop water temporarily, but it does not replace rusted metal, repair missing step flashing, or correct a missing cricket.
Repair or Replace? An Honest Guide
Not every chimney leak requires a full flashing replacement: and almost none require an automatic full roof replacement.
Minor issues may be addressed with:
Re-sealing a sound counter flashing joint using a quality, UV-stable sealant
Replacing a small number of damaged step flashing pieces
Repairing a localized section of underlayment or roof decking
Correcting a small gap or loose edge before water damage spreads
However, sealant-only repairs are usually temporary. Depending on exposure and the condition of the underlying flashing, they commonly fail within one to four years. If the metal is rusted through or the flashing is improperly configured, applying more caulk only delays the necessary repair.
A complete chimney flashing replacement is usually appropriate when the metal is:
Rusted through or heavily corroded
Bent, cracked, or separated
Missing sections
Installed without proper overlap
More than approximately 20 years old
Unable to be repaired without disturbing the rest of the flashing system
The condition of the surrounding shingles and roof deck also matters. A roof may have plenty of useful life remaining even when its chimney flashing needs to be replaced.
What Does a Proper Chimney Flashing Repair Involve?
A durable repair starts by removing failed materials: not covering them.
The roofing contractor should carefully remove damaged flashing, nearby shingles, old sealant, and any deteriorated underlayment. The exposed roof deck and masonry should then be inspected for hidden damage.
A professional repair commonly includes:
Removing failed flashing and sealants completely
Repairing damaged decking or underlayment
Installing ice and water shield around the chimney base
Installing properly overlapped base and step flashing
Cutting a fresh reglet into the chimney mortar
Installing counter flashing into the masonry
Sealing the reglet with a UV-stable sealant
Reinstalling shingles so each layer sheds water downhill
Testing the completed repair when appropriate
Roofing tar and caulk should never be treated as the primary waterproofing barrier. As IKO’s roof flashing guide explains, sealant can provide supplemental protection, but it cannot replace properly overlapped and mechanically installed flashing.
Because chimney work involves steep roof surfaces, masonry tools, and fall hazards, homeowners should avoid climbing onto the roof to investigate or attempt repairs. From the ground, you can look for visibly lifted metal, missing sealant, or buckled shingles. A qualified roofer can perform a closer inspection safely.

Why a Professional Inspection Can Save You Money
When a chimney leak appears, some roofing companies in Salisbury, MD may immediately recommend a complete roof replacement. That may be appropriate if the roof has widespread damage, but a localized flashing failure should not be used as an automatic reason to replace an otherwise serviceable roof.
A thorough inspection should examine:
The chimney flashing system
Nearby shingles
The roof deck and underlayment
Attic framing and insulation
Interior water stains
Chimney masonry and mortar joints
The presence or condition of a cricket
Other nearby penetrations that could mimic a chimney leak
A good roofer Salisbury homeowners can trust will explain what failed, show you the evidence, and distinguish between a repairable flashing problem and a roof that has reached the end of its useful life.
Peninsula Roofing Company has served Delmarva since 1947: more than 75 years of residential and commercial roofing experience. Our inspectors perform free, in-person inspections rather than relying only on drone footage. We evaluate the actual condition of the roof and provide honest repair-versus-replace guidance.
If you need Salisbury roofing assistance, learn more about our roofing repair, replacement, inspection, and maintenance services, or contact Peninsula Roofing to schedule an inspection.
Schedule a Free Chimney Flashing Inspection
A chimney leak is often a flashing problem: not a whole-roof problem. Catching it early can help prevent damaged decking, interior repairs, insulation issues, and mold-related moisture concerns.
If you notice a water stain near your chimney, rusted flashing, cracked sealant, or buckled shingles, contact Peninsula Roofing Company for a free chimney flashing and roof inspection. Call 410-742-6163 or send us a message online. We serve homeowners and businesses throughout Salisbury, MD, and the Delmarva Peninsula, with 24/7 emergency response available when a leak cannot wait.
Comments