Rain's Coming: What to Check on Your Roof Before It Hits

Heavy rain rarely finds a single hole in your roof. More often, it overwhelms a system.
During a downpour, water is moving quickly across roof planes, through valleys, into gutters, around flashing, and away from the foundation. When one part of that system is blocked, damaged, or undersized, water backs up somewhere it should not. The result may look like a roof leak, even when the shingles themselves are not the primary problem.
That is why the most useful pre-rain inspection is not a generic walk-through of every shingle. Focus first on the places that concentrate or trap water.
You can complete most of this inspection from the ground with binoculars, along with a flashlight for the attic. Never climb onto a wet roof. Wet shingles are slick, and a roof weakened by moisture or storm damage may not be safe to walk on.
1. Check the valleys first
Roof valleys are the channels where two roof planes meet. During heavy rain, runoff from both planes concentrates in the same area. A valley that handles ordinary rainfall without trouble can become overwhelmed during a sustained downpour.
From the ground, use binoculars to look for:
Leaves, pine needles, branches, and grit
Water stains or darkened areas below the valley
Missing, cracked, or displaced shingles along the valley line
Rusted or separated valley flashing
Signs that water has been pooling instead of flowing toward the eaves
Debris in a valley can act like a dam. Once water pools behind it, the water may work its way beneath nearby shingles and into the roof assembly.
One important warning: never seal across the channel of a roof valley. Caulking or roofing cement placed across the valley interrupts drainage and creates the very dam you are trying to prevent. If sealing is appropriate, it should be applied along the proper edges, not across the path where water needs to flow.
A valley with visible rust, damaged flashing, or missing shingles deserves a closer inspection before the next major storm.
2. Inspect gutters and downspouts
A blocked gutter can create a roof leak without a hole in the roof.
When a gutter is full of leaves or sediment, rainwater cannot leave the roof edge quickly enough. The water backs up against the eave and may be forced beneath the lower shingles. Inside the house, that can look exactly like a roof leak.
Check for:
Gutters pulling away from the fascia
Sagging sections where water collects
Overflow marks on the siding
Loose or separated gutter joints
Downspouts that are clogged, bent, or disconnected
Granules collecting near downspout outlets
Also check where each downspout discharges. Water should generally be directed four to six feet away from the foundation. If it empties directly beside the house, the problem has simply moved from the roof to the basement or crawlspace.
Concentrated water at the foundation can saturate the soil and increase hydrostatic pressure against basement walls. In homes with crawlspaces, it can also contribute to persistent dampness and musty odors.
Gutters and downspouts are part of the roof drainage system, not an unrelated exterior detail. If they cannot move water away efficiently, the entire roof system is at greater risk during heavy rain.
3. Look closely at flashing and penetrations
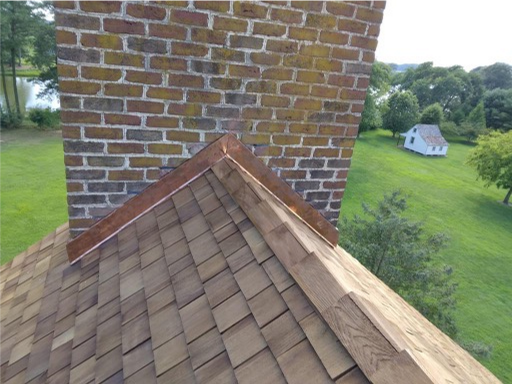
Flashing and roof penetrations account for a large share of roof leaks, often estimated at 80% to 90% of leak calls. These are the transitions where roofing materials meet chimneys, skylights, plumbing vents, walls, and other structures.
Pay particular attention to:
Chimney flashing and counterflashing
Skylight edges
Plumbing vent boots
Roof-to-wall transitions
Dormers and roof additions
Areas where metal flashing appears lifted or separated
Cracked, missing, or shrinking sealant
Rusted metal
Cracked or split rubber vent boots
Wind-driven rain is especially good at finding weaknesses that ordinary rainfall has quietly bypassed. A small gap in aged sealant may not leak during a light shower, but wind can push water sideways and beneath flashing.
Coastal humidity and salt air make these details especially important throughout Delmarva. Metal flashing, fasteners, and other exposed components can corrode faster near the coast. In practical terms, roof materials in this environment may have their useful lifespans shortened by 15% to 25% compared with similar materials inland, particularly when maintenance and ventilation are poor.
That does not mean every roof needs to be replaced early. It does mean small breaches should not be ignored. In a humid coastal climate, a minor leak can become soft sheathing, rot, or mold more quickly than homeowners expect.
4. Check roof-to-wall intersections, and look for the gap
Where a roof meets a wall, siding and flashing must be detailed so water has a way to drain away.
This connects to our recent article, “Mind the Gap: Why J-Channel and Roof Flashing Should Never Sit Flush”. J-channel and other flashing at a roof-to-wall intersection should never be pressed flush against the roof surface.
A small gap is intentional. It allows water that gets behind the siding to escape instead of becoming trapped at the roofline.
From the ground, look for:
J-channel or trim sitting tightly against the roof
Caulk bridging the drainage gap
Open seams where siding meets flashing
Staining below the roof-to-wall intersection
Moss or discoloration suggesting persistent moisture
If someone has sealed the entire intersection tightly against the roof, water behind the siding may have nowhere to go. That trapped moisture can damage the wall assembly and roof edge during repeated rain.
5. Inspect low-slope and flat roof sections
Flat and low-slope roofs depend heavily on properly functioning drains, scuppers, and carefully designed drainage paths. They are not expected to shed water as quickly as steep-slope shingles.
Before heavy rain, check that drains and scuppers are free of leaves and other debris. Do this only from a safe location or have a professional perform the inspection; flat roofs can still be slippery and may contain hidden weak areas.
After the rain, pay attention to ponding. If water remains on a low-slope or flat roof 48 hours after the rain stops, that is usually a drainage or structural deflection issue, not a mystery.
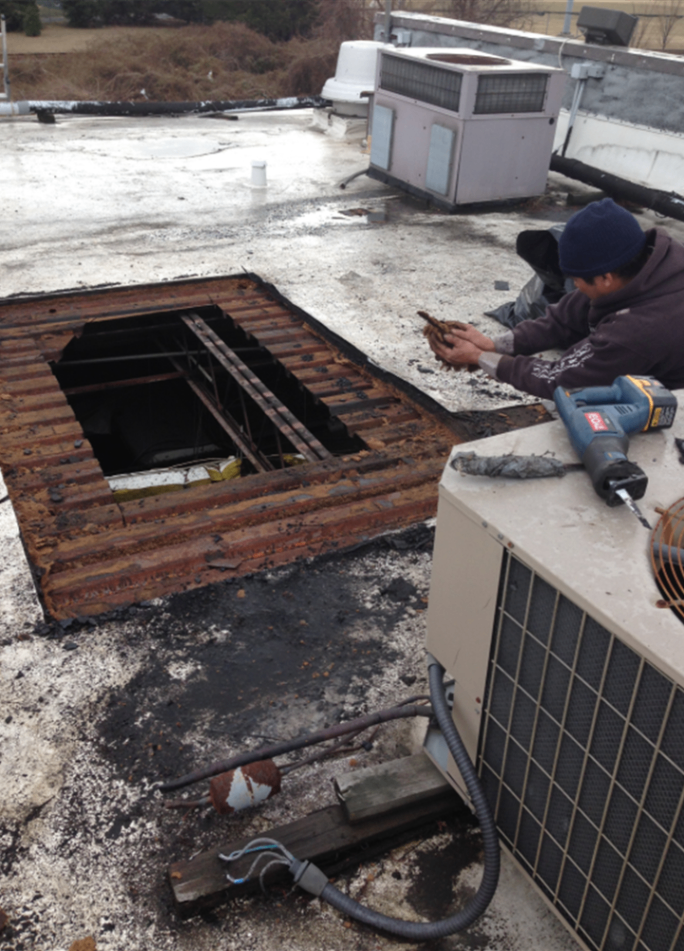
Persistent ponding can place additional stress on a roof membrane, seams, insulation, and the supporting deck. It may indicate a blocked drain, an improperly sloped section, or a deck that has started to deflect under moisture and age.
6. Check the attic before the rain starts
An attic inspection is most useful while conditions are still dry. Use a flashlight and look at the underside of the roof deck for:
Existing water stains
Damp or compressed insulation
Soft or discolored wood
Daylight pinpoints around fasteners or roof penetrations
Musty odors
Mold or signs of prolonged humidity
Staining below valleys, chimneys, and plumbing vents
Checking before the storm gives you a baseline. If you find a stain while the roof is dry, you can often trace it back to a specific area. After a major storm, water may travel along rafters, insulation, and framing, making the original entry point harder to identify.
If you find active dripping, wet insulation, a sagging ceiling, or a large area of damaged decking, do not wait for the next storm. Move valuables away from the area and arrange for professional help.
Why timing matters in early fall
For Delmarva homeowners, early October is often one of the last practical windows for dependable exterior roof repairs before colder weather becomes a regular factor.
Many sealants, adhesives, and roofing materials need temperatures above roughly 40°F to 50°F to cure and perform properly. As temperatures fall, repairs can take longer, become more weather-dependent, and be less reliable if installed on cold or damp surfaces.
That does not mean every repair must be completed immediately, regardless of conditions. It means that if you find a damaged valley, failing flashing, or blocked drainage path, it is better to address it while the weather still allows the work to be done correctly. In about six weeks, the same repair may require more scheduling flexibility and additional precautions.
A roof check should not automatically lead to replacement
The purpose of this checklist is not to convince you that your roof needs to be replaced. It is to help you distinguish between a damaged roof and an overwhelmed drainage system.
A clogged gutter, blocked valley, failed vent boot, or separated piece of flashing may be repairable. Identifying the actual entry point can prevent an unnecessary replacement while also stopping a small issue from becoming sheathing rot.
Peninsula Roofing Company has served Delmarva since 1947, with dedicated residential and commercial teams for inspections, repairs, maintenance, replacement, and storm response. Our inspectors evaluate roofs in person, not by drone, because water-entry points, flashing gaps, attic conditions, and roof-to-wall details cannot always be judged from aerial images.
We offer free in-person inspections, honest repair-versus-replace guidance, financing options, and 24/7 storm response when a problem cannot wait. If you are searching for roofing companies in Salisbury, MD, a roofer in Salisbury, or Salisbury roofers for a pre-rain evaluation, the best time to schedule is while the weather still allows reliable repairs.
Contact Peninsula Roofing Company to book an inspection or call 410-742-6163. A roof that looks intact may still have a drainage problem waiting for the next downpour. Checking the system now gives you the best chance to find it before the rain does.
Comments